Using PhotoFusion
PhotoFusion combines your digital photos with GPS data to determine where the pictures were taken. Simply download your GPS track into TopoFusion and point TopoFusion to a directory containing pictures you took during that time. PhotoFusion can do the rest. Photo thumbnails are placed (as waypoints) on the map and optionally geotagged in the Jpeg (EXIF) headers.
Requirements:
- Digital pictures in JPEG form (.jpg or .jpeg) with EXIF headers containing timestamps (almost all digital cameras save this information)
- GPS Data with timestamps (almost all GPS devices save this information)
The PhotoFusion dialog can be found in the Analysis Menu->PhotoFusion. Alternatively, right click on a file in the active files list and choose Analysis->PhotoFusion.
First, select the file (must be loaded in TopoFusion) containing the GPS data for your photos. Next, choose the directory containing your digital pictures in the top box by pressing the "..." button to right of it. Then select a time offset associated with your camera (not GPS). For convenience, a drop-down box is provided with common time zone offsets that will fill in the GMT offset box for you. TopoFusion requires this information from you because your GPS data stores the GMT time at each point, not the local time. Your camera is most likely set to local time, so TopoFusion needs to know how far offset it is from GMT (Greenwich Mean Time).
Now click the "Begin PhotoFusion" button. Take a look at your track in the map window. If all is good, you now have waypoints for each of your photos. Check the red text in the status area for progress and an accounting of the number of photos that were georeferenced.
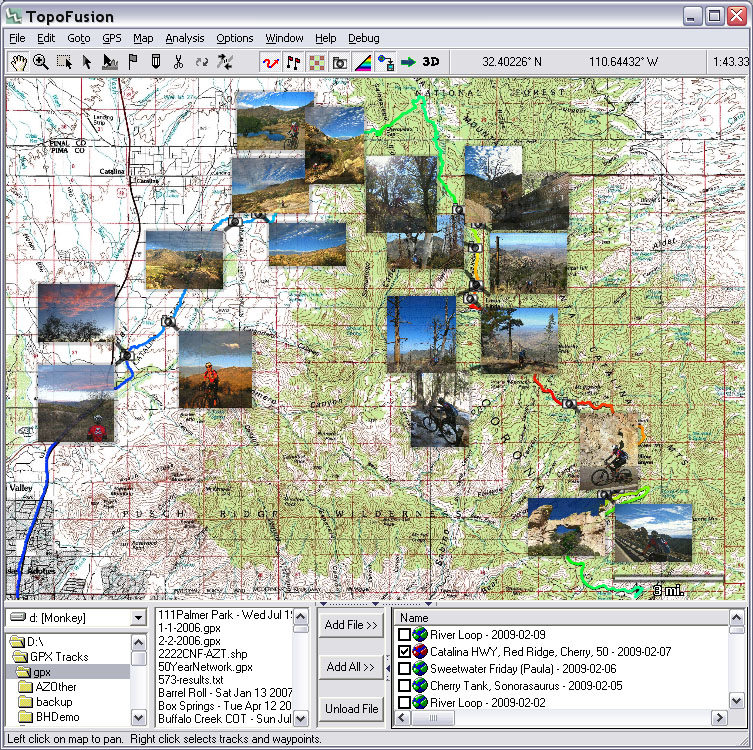
Enable the Photo Toggle (
 on the
toggle bar) to display image thumbnails on the screen as shown in the screen
shot at the top of the page. Moving the mouse over a photo thumbnail will
enlarge it slightly and change the cursor to a magnifying glass. Clicking once
expands the photo in the map window. Clicking again will launch your
computer's default image viewer to view the photo in full resolution.
on the
toggle bar) to display image thumbnails on the screen as shown in the screen
shot at the top of the page. Moving the mouse over a photo thumbnail will
enlarge it slightly and change the cursor to a magnifying glass. Clicking once
expands the photo in the map window. Clicking again will launch your
computer's default image viewer to view the photo in full resolution. Photos as waypoints In PhotoFusion Pro, photos are simply waypoints with coordinates at the location the photo was taken, and the pathname to the JPEG file in the "URL" field of the waypoint. This means that your photos can be moved (using the select points tool), deleted and edited using the normal waypoint tools available in TopoFusion. This is useful to separate photos that might be too close to each other, and to delete uninteresting photos. All the necessary information is saved in the GPX file.
Other Options:
- Replace Current Pictures on Placement: This option is useful if you wish to adjust the time offset to more accurately place your photos. If your camera's time was a few minutes off GPS time, you may need to experiment to get the offset correct. This option ensures that you don't get duplicate photos at slightly different offset. If unchecked, any new photos will simply be added to the current GPX file without checking for duplicates.
- Add URL prefix instead of path: TopoFusion can load photos (for thumbnail display on the map as well as HTML generation) from web sites as well your local filesystem. Use this option to add an http prefix to the filename in the resulting waypoints INSTEAD of the local pathname. Note that you need to have the photos in the local pathname chosen in the JPEG Directory first. Photos won't be able to load unless you have also uploaded the relevant jpeg files at the http prefix you provide here. This way you can share just a GPX file and still have photos load on other people's computers (the TopoFusion demo contains an example GPX that does this from Kokopelli's Trail.)
- Write coordinates to JPEG EXIF headers TopoFusion can
write lattitude, longitude and elevation data into your photos when this option
is selected. The freeware program EXIFtool is required. If
you don't have it, TopoFusion will bring up the following dialog:
Hitting the download button is all you need to do to get the software and have it stored in the right place. Once you have EXIFtool, you'll be able to write coordinates to your images for use in other software or publishing on the web. Your original photos will be saved as filename.jpg_original.
While you are figuring out the correct time offset for your photos, it is best to have the Place pictures as waypoints option and the Replace duplicate photo waypoints option checked. This way you can test the placement of the photos and adjust if necessary. The "Write coordinates to JPEG EXIF Headers" option takes more time since it writes out backup files, so only choose this option when you are done and ready to geotag.
If you only want to geotag photos and not clutter your GPX files with waypoints, you can leave the "Place pictures are waypoints" option unchecked.
Possible Error Messages:
- No jpegs found. TopoFusion's search for .jpg/.jpeg files failed in the directory specified, check to make sure you picked the right directory and that it has JPEG files in it.
- No proper EXIF headers in jpegs. TopoFusion found JPEG files, but it didn't find any that had EXIF headers with timestamps.
- No time data found in tracks, can't place pictures! The GPX file you are trying to attach pictures to unfortunately doesn't contain time data. TopoFusion relies on the time data to place the pictures.
- All of the picture times were BEFORE/AFTER the GPS data, adjust the time offset to compensate. When receiving this message, Topofusion will tell you the latest picture time and the earliest trackpoint so that you can get some idea of how you should change your offset. This is most likely caused by an incorrect offset, or a camera with the incorrect time. For the best results, synchronize your camera's time with your GPS's time.
HTML Page Generation
Once photos are placed, PhotoFusion allows you to generate web pages with a click-able imagemap of your map and pictures. Two types of imagemaps are available:
Thumbnails on map:
 Gunnison Exploration Day 1
Sedona Circumcision Loop
Gunnison Exploration Day 1
Sedona Circumcision Loop
Photo icons only:
24 Hours of Old Pueblo Sutherland/Baby Jesus CDO+Red Ridge (Snow) Agua Caliente to MilagrosaBoth types of web pages include the profile of your GPS track, statistics and a table of all photos. To get clickable thumbnails on the map, simply leave the Photo Toggle on when you hit the Generate HTML ImageMap button. If the toggle is off, the resulting image map will only be clickable on the photo icons themselves.
Steps for HTML Generation: First ensure you have placed photo waypoints on your track. Next, you must set a destination directory for the HTML page and other assorted files. Do this by clicking the "..." button.
The resulting map will be the exact size of your TopoFusion map view. So, you should next resize your TopoFusion window to the desired size. Zoom/Pan the map view to include your desired view of the track. You can, if you wish, choose a different size for the generated thumbnails in the dialog (default is 160x120).
Hitting the Generate HTML ImageMap button will activate the status bar, showing the progress of thumbnail generation. Aerial and Topo views will be generated (at the current zoom level). Navigate to the destination directory and open up "index.html" to view your web page.
Note: this page applies to PhotoFusion in the Pro version of TopoFusion. For info on PhotoFusion in TopoFusion Basic, see: PhotoFusion Basic.